GitHub offers a ton of value through its git-complementing feature set. In fact, without the use of GitHub, it’s likely that quite a lot of distributed development teams would struggle to meet modern demands and make deadlines on a regular basis. However, between Git and GitHub, there are numerous complexities to navigate. Among these is the workflow necessary for comparing unique branches in a given codebase and consolidating their differences.
The exact command you’ll need to use in order to take a deeper look at branch differences varies based on the object of your investigation. Here’s how you can get this done without getting hopelessly confused.
How to compare branches in GitHub Desktop
GitHub Desktop is a handy GitHub client that features a graphical user interface to simplify your GitHub management efforts. You can use GitHub Desktop to take a closer look at your project’s branches and even perform full-blown comparisons between them. This functionality is accessed entirely through a clickable interface that dispels the more detailed, command-line-based approaches, replacing these with an optimized, streamlined set of buttons and menus.
Comparing branches is as easy as selecting the “compare to branch” option while perusing the feature branch you’d like to compare to another. The compare to branch option in GitHub Desktop is located under the “Branch” in the main menu at the top of the interface. This should open up a quick view of the differences Git has identified behind the scenes. This view can optionally be expanded to a split view, and the differences identified can be cleaned of all whitespace changeswithin individual files as well, making for a much more productive experience overall.
How to compare branches in Git
You can always perform branch comparisons from Git if you are comfortable interacting directly with the command line tools it offers. Using Git directly gives you access to a couple of distinct commands that make it easy to compare specific parts of your project.

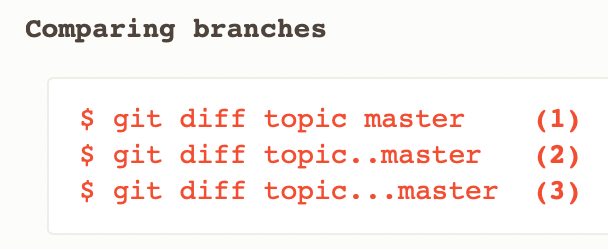
The first of these is the diff command. Git diff allows you to compare two branches to each other with relative ease simply by specifying each branch’s name with two periods between them, like this:
git diff brancha..branchb
When this command is used, Git actually generates a clear comparison between each branch’s tips. This information takes the form of a diff, which contains a summary of the differences, making it much easier to see where both branches differ from each other. The commits that are contained in the second branch you’ve specified that are not in the first are specified. Files added in the right branch are displayed with a color code for green. Similarly, files that have been removed from the same branch are shown with a color code for red.

The diff command can be modified using an additional period between the two specified branches. This way, instead of comparing the right branch to the left one, diff will calculate all of the differences between the right branch and the common ancestor of both it and the left branch. This fairly significant difference is not readily apparent when you look at it from a purely syntactic perspective.
git diff command can also be used on a single file present (or not) in both branches should the need arise. For this option, you will need to include the following in the previous line of code:
git diff topic..master -- filename
The additional detail above tells Git to focus specifically on changes made to the document you have given the name of. The aforementioned three-period syntax makes the same comparison between the feature branch and the two specified branches’ common ancestor.
The second command that you can use to compare branch differences is “log.”

git log will show you all of the commit differences between the branches you specify, and, aside from the term diff being replaced with log, the syntax is exactly the same as the previous command. Git log can be used to view detailed commit history differences between both specified branches, but it will not show you which files have changed—only diff can do that for you.
Simplify with Mergify 🥰
At Mergify, we know how tedious seemingly simple tasks on GitHub can become, especially as your project scales and your team expands. Our automation suite simplifies complex and plain old redundant GitHub processes to give your team the freedom they need to meet new milestones.
Queue up new merge requests, automate the actual merges that make it through your CI pipeline, rebase, label, assign for review and more with Mergify.
Learn more about Mergify and how we can help your team regain its focus today.

